CUTEST SPIDER WEB VINTAGE HALLOWEEN-INSPIRED CAKE
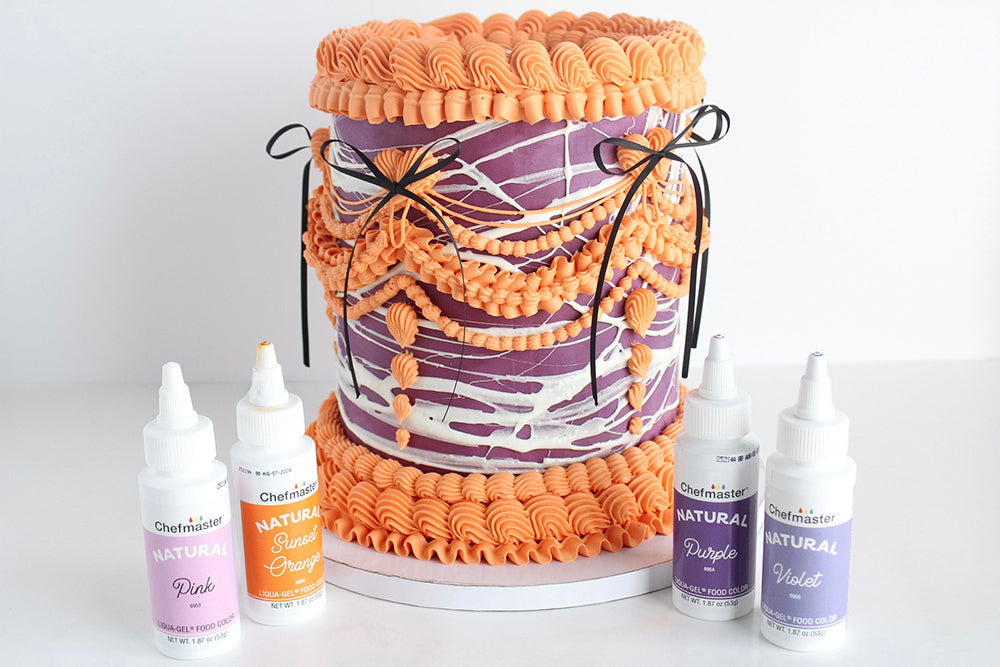
This adorable and spooky cake is bold, playful, and perfect for the Halloween season - keeping it on the bright and cute side with vibrant purple and peachy orange buttercream, black bow accents, and vintage style piping, it’s the ultimate statement dessert for your next spooky party celebration. You may easily enjoy with your preferred cake flavor or spice it up with a dark and delicious black cocoa chocolate cake.
For this cake, we wanted a soft cute vibe for kids and adults, that still showcases a lovely Halloween look with a spooky (but delicious) edible marshmallow spider webbing.
Ingredients:
Vanilla Cake Batter (or substitute for your favorite cake recipe):
1 3/4 cup (350g) Granulated Sugar
1 3/4 cup (210g) All-Purpose Flour
1 cup (120g) Cake Flour
1 cup (245g) Buttermilk (room temperature)
3/4 cup (170g) Unsalted Butter (room temperature) (salted is okay, see notes)
1/2 cup (120g) Sour Cream (room temperature)
1/3 cup (64g) Vegetable Oil
3 Large Eggs (room temperature)
1 Egg White (room temperature)
2 1/2 Tbsp (13g) baking powder
1 Tbsp (13g) vanilla extract
1 tsp (5g) salt
Buttercream Frosting:
(Makes approx. 6 cups)
5 cups Powdered Sugar
3 cups (6 sticks) Unsalted Butter (room temperature)
2 Tbsp Hot Water, Milk or Heavy Cream
1 Tbsp Clear Vanilla
1 tsp Salt
1 tsp Lemon Juice
Cake Decorations:
Chefmaster Natural Liqua-gel© food coloring: Natural Sunset Orange, Natural Violet, Natural Pink, Natural Purple
Marshmallows
Black 1/8” Ribbon (Optional)
Spider Toppers or Sprinkles (Optional)
Tools & Utensils:
Kitchen Scale
Measuring Cups & Spoons
Stand Mixer or electric mixer
Bowls
Spatulas
4 – 5” round cake pans
Turn Table (optional)
Cake Scraper (Smooth edge)
Pastry bags
Decorating tips
Preparation:
- Cut your butter for both your cake batter and buttercream into small squares (about ½ to ¾ inch) and set aside in separate bowls to soften.
- Prepare and measure the rest of your ingredients.
- Preheat oven to 350°F and line (or grease) your cake pans.
Prepare your Cake Layers
- Sift both flours, granulated sugar, baking powder and salt into a mixing bowl.
- In a smaller bowl, mix your buttermilk and sour cream until it is an even thicker consistency.
- Add your eggs, egg white, oil, and vanilla. Whisk until combined and set aside.
- Slowly add ¾ cup cubed butter to your dry ingredients while your mixer is on low.
- Once all your butter is added, turn up the speed 1-2 notches. Do not overmix this step, it should resemble wet sand.
- While your mixer is on low, slowly let your wet ingredients drizzle into the bowl. Scrape the sides and bottom halfway through. Mix until ingredients are just combined, we do not want to overmix here either! You may finish off by folding with a spatula to remove any excess lumps.
- Fill your cake pans halfway.
- Bake cakes for approximately 30-40 minutes or until a toothpick comes out from the center with some crumbs and there is no jiggle.
Make your Buttercream Frosting
- Using a whisk attachment, whip your room-temperature butter for about 5-10 minutes until it becomes bright white and fluffy. Make sure your butter turns white before proceeding to the next steps or else you will get a strong taste of butter.
- Start to slowly add about a cup of powdered sugar at a time while your mixer is on low. Stop mixing as soon as the powdered sugar has combined with the butter.
- Add in your vanilla, lemon juice and salt and a touch of pink food coloring to start.
- Turn your mixer on medium speed. While it whips, slowly drizzle in your warm water or cream.
- Switch to a paddle attachment and let the mixer run on the stir or low setting for 10 minutes.
- Split into two bowls, coloring one with equal parts Natural Pink & Sunset Orange, the other bowl with equal parts Natural Purple & Violet.
Assemble and Decorate your Cake
- Starting with your cake board and a small amount of buttercream and add your first cake layer.
- Take your buttercream and add a layer between each cake layer and place in the fridge to set up.
- Once chilled, add your final thin layer of purple buttercream, then use a bench scraper and smooth your final layer, do this a few times to achieve a smooth base. Don’t worry about any imperfections (our spider webbing will cover it up later)
- Melt some marshmallows in the microwave or on the stovetop on low and stir until fully melted. If it is too liquid, let it cool for a minute or two until you can put in between your fingers and it pulls apart like a web.
- Wearing gloves, place a good amount in your palm, squish your hands together and separate with your fingers spread out to create the web. Quickly place and wrap around your cake. Do this a few times until satisfied.
- Decorate to your desired liking, we used our peachy orange buttercream a few of our favorite tips to add a vintage style look. We also added some cute black bows; however, you may also add sprinkles, or spider toppers for the ultimate Halloween look!
Tips for this Spider Web Halloween Cake
- Swap orange for neon green for a witchy vibe.
- Try different piping tips for variety in textures or opt out of the vintage piping entirely.
- Add edible luster dust or glitter for extra pizzazz and shine.