A TASTE OF FALL: CARAMEL APPLE CIDER OMBRE CAKE
Who doesn’t love the crisp leaves, warm spices, and cozy baking days? This tall, golden beauty is your perfect fall centerpiece. Dripping in rich caramel and crowned with cinnamon sugar apple cider donuts and macarons, this Caramel Apple Ombre Cake captures everything we love about autumn in every slice.
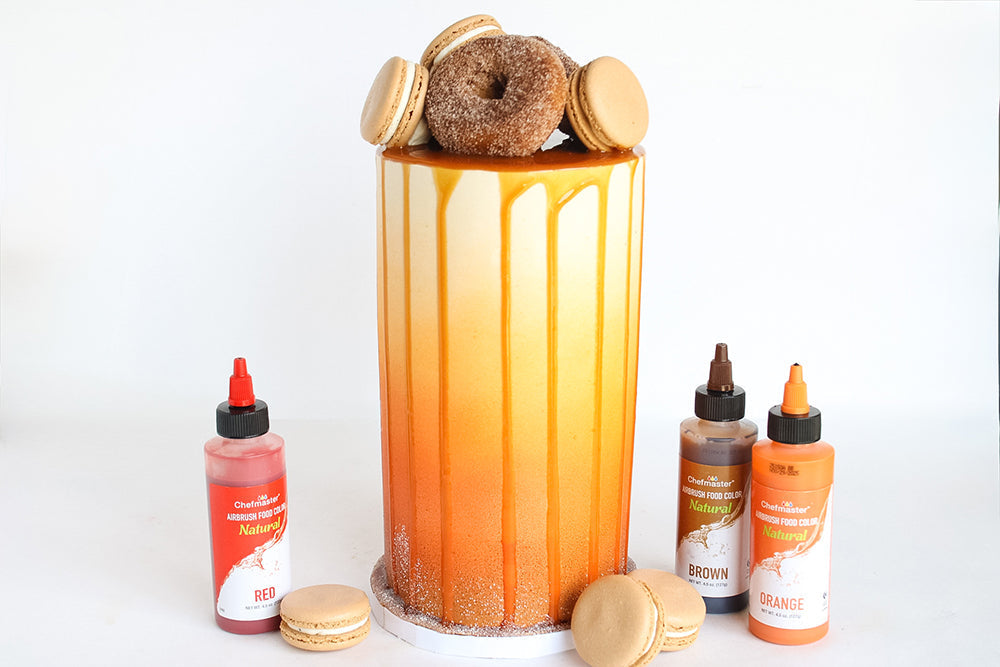
With an airbrushed gradient of warm fall shades, this cake is equal parts rustic and refined. It’s decorated using Chefmaster’s Natural Airbrush Food Colors in Red, Orange, and Brown, which create that stunning ombré effect without compromising flavor or texture.
Whether you’re hosting a fall birthday, Friendsgiving, or just want to bring some harvest magic to your table, this cake is a showstopper. Better yet, customize to your liking with different cake flavors, and toppings. While we used a spiced vanilla bean cake, a choice of a warm apple or spiced cake would bring all the fun flavors of fall together.
Ingredients:
Vanilla Bean Spice Cake:
3/4 cup (170g) Unsalted Butter (room temperature)
1 3/4 cup (350g) Granulated Sugar
3 Large Eggs (room temperature)
1 Egg White (room temperature)
1 cup (120g) Cake Flour
1 3/4 cup (210g) All-Purpose Flour
1/2 cup (120g) Sour Cream (room temperature)
1 cup (245g) Buttermilk (room temperature)
1/3 cup (64g) Vegetable Oil
1 Tbsp (13g) Vanilla Bean Paste
2 tsp Cinnamon
1/4 tsp Nutmeg
2 1/2 tsp Baking Powder
1 tsp Salt
Buttercream Frosting:
(Makes approx. 6 cups)
5 cups Powdered Sugar
3 cups (6 sticks) Unsalted Butter (room temperature)
2 Tbsp Hot Water, Milk or Heavy Cream
1 Tbsp Clear Vanilla
1 tsp Salt
1 tsp Lemon Juice
Chefmaster Natural Brown liqua-gel food coloring
Cake Decorations:
Chefmaster Natural Airbrush food coloring: Natural Red, Natural Brown and Natural Orange
Caramel Sauce or Drip
Mini Cinnamon Sugar Donuts
Macarons (store-bought or homemade)
Sparkling sugar (optional)
Vanilla bean Ganache (optional)
Tools & Utensils:
Kitchen Scale
Measuring Cups & Spoons
Stand Mixer or electric mixer
Bowls
Spatulas
3 – 6” round cake pans
Turn Table (optional)
Cake scraper
Palette Knifes and offset spatula
Pastry bags
Airbrush Gun
Preparation:
- Cut your butter for both your cake batter and buttercream into small squares (about ½ to ¾ inch) and set aside in separate bowls to soften.
- Prepare and measure the rest of your ingredients.
- Preheat oven to 325°F and line (or grease) your cake pans.
Prepare your Cake Layers
- In a smaller bowl, mix your buttermilk and sour cream until it is an even thicker consistency.
- Add your eggs, oil, and vanilla paste. Whisk until combined and set aside.
- Slowly add your cubed butter to your dry ingredients while your mixer is on low.
- Once all your butter is added, turn up the speed 1-2 notches. Do not overmix this step, it should resemble wet sand.
- While your mixer is on low, slowly let your wet ingredients drizzle into the bowl. Scrape the sides and bottom halfway through. Mix until ingredients are just combined, we do not want to overmix here either! You may finish off by folding with a spatula to remove any excess lumps.
- Pour your cake batter into your prepared cake pans. We used 4, 5” pans filling them about ½ way. Bake for about 30-35 minutes or according to your cake recipe and pan size.
- Bake and let cool completely, then level your layers, and freeze. It is best to stack with cold cake.
Make your Buttercream Frosting
- Using a Whisk attachment, whip your room-temperature butter for about 5-10 minutes until it becomes bright white and fluffy. Make sure your butter turns white before proceeding to the next steps or else you will get a strong taste of butter.
- Start to slowly add about a cup of powdered sugar at a time while your mixer is on low. Stop mixing as soon as the powdered sugar has combined with the butter.
- Add in your vanilla, lemon juice and salt and a touch of pink food coloring to start.
- Turn your mixer on medium speed. While it whips, slowly drizzle in your warm water or cream.
- Switch to a paddle attachment and let the mixer run on the stir or low setting for 10 minutes.
- Add 2-3 drops of Chefmaster Natural Brown to achieve an ivory base.
Assemble and Decorate your Cake
- Starting with your cake board and a small amount of buttercream and add your first cake layer.
- Take your ganache or buttercream and pipe a ring along the top of the cake to create a dam. Using a spatula, seal the edges.
- Fill with your caramel filling and place your next cake layer on top. Repeat until you have all your layers stacked.
- Use some buttercream or ganache to crumb coat and chill in the refrigerator.
- Once chilled, add your final thin layer of ivory buttercream, then use a bench scraper and smooth your final layer, do this a few times to achieve a smooth base for our airbrushing.
- Using your airbrush, (we will airbrush from about 3/4 way from the top to the bottom) start with Orange lightly then darken as you go down. Proceed with Red, then Brown at the bottom. Keep your airbrush at least 6-8 inches away and do long strokes to create an even light layer of color.
- Let dry for a few minutes and add your caramel using a spoon, bottle, or piping bag to create the drips. Fill the top and smooth using a spatula.
- Decorate to your desired liking, we used fresh apple cider donuts, homemade vanilla bean caramel macarons and sanding sugar.
Fall in Every Bite
This Caramel Apple Cake is everything fall should taste like—sweet, spiced, buttery, and warm. The ombré airbrush adds dramatic flair, while the donuts and caramel make it feel like a cozy fairground treat.
Thanks to Chefmaster’s All-Natural Airbrush Colors, you can achieve vibrant fall tones with clean, natural ingredients. No compromise on color. No compromise on flavor. Just a beautiful, edible work of art.
DOWNLOAD PDF